Creating 360° panoramic images
A how-to and some recommendations
I've been creating 360 panoramas over the last 15 years, and have developed a workflow which results in well-lit, high resolution output.
There are several ways to create panoramas. I favour the multi-frame stitched approach as it yields high resolution and is very controllable. The hardware required is a camera, a panoramic head (either manual or automated) and a tripod.
It's not a simple process – to do it well you need suitable hardware, software and and an understanding of how to use it, and a reasonably highly specified modern computer. However, none of this is rocket science, especially if you already know how to control a camera in manual mode, and can create a digital workflow.
The alternatives to this approach
For significantly lower cost and skill level, and possibly adequate quality depending on your requirements, there are mobile phone and tablet apps, as well as inexpensive one-shot 360 degree cameras. For potentially more expense, and less flexibility, dedicated 360 cameras with multiple lenses around a spherical body create high quality ready-stitched output. It's horses for courses.
There are three steps to building panoramas:
- Create image source
- Build display image
- Present and and publish the content
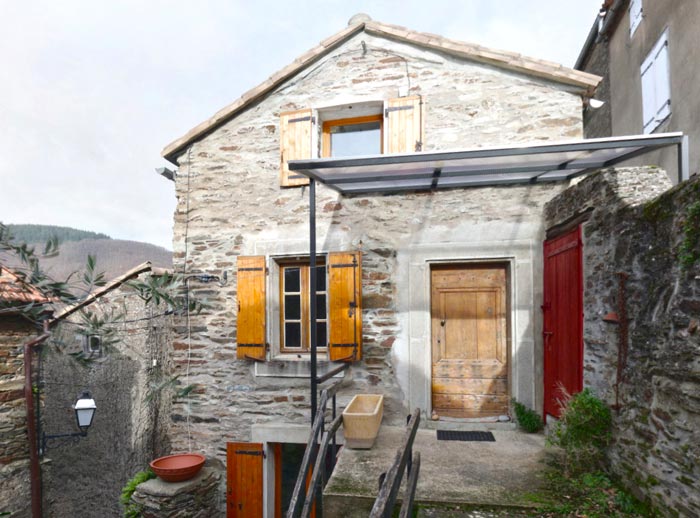
A property virtual tour
This house in a French village was advertised in Green Acres (price €199 for a year) and received plenty of enquiries. All enquirers were sent a link to the virtual tour, which resulted in multiple viewings, and sale.
See the tourCreating the source images
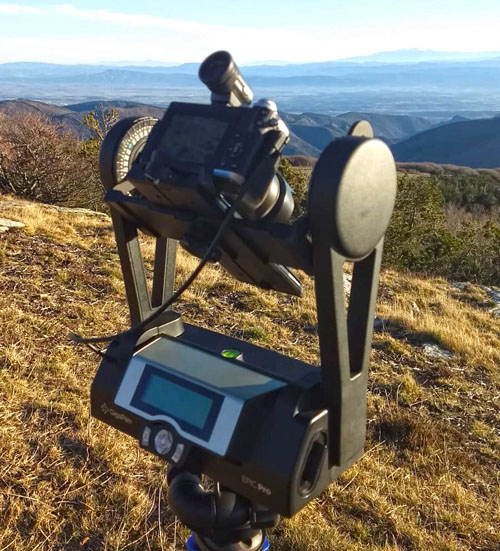
Using a multi-row and multi-column panoramic head which rotates around a central point, you capture the scene shot-by-shot, and merge the images together to create the full panorama. There are manual and automated options available.
Panoramic head options
A good budget manual pano head is the Nodal Ninja, (or for less, similar by cheaper brands to be found on eBay etc). This will just about carry a mid size digital SLR, not a full-frame one, and is much easier to use with a mirrorless camera. Ideally use a wireless shutter remote. Bearing in mind it's manual, the 48 shots I'd happily do on an automated head isn't feasible. It's such a long time since I used this that I can't recall the focal length other than that bit was fairly wide, and the 12 to 15 shots per composition is realistic.
The automated Gigapan Epic Pro enables many more images per scene, making possible the use of a longer focal length which improves finished image quality and resolution. Being automated, once you've set up your camera position (or, more specifically, the nodal point of your lens), and decided on your capture settings and exposure, it just gets on with the job. The main thing for you to do is avoid getting in the picture: stand by if it's windy, otherwise get out of shot.
Several other choices exist in the way of panoramic heads, both manual and automated. So long as they operate accurately, all will help you photograph the images required for good quality panoramas.
Setting up your pano head
For multi-frame panoramas to align accurately at the detection stage, especially in short depth-of-field shots such as interiors, the point where the light enters the camera must be consistent across all the shots that make up the image. This is known as the 'nodal point'. If you're using a lens with variable focal length, establish and maintain an exact position as a setting on the pano head for that f-length.
Setting accurate position of the camera on the pano head really is key to everything working well down the line. The vertical centre of the lens in line with head's pivot point is simple to set. The more difficult is finding the nodal point, where light crosses over in the lens and aligning how far back or forward on the mount the camera needs to sit.
Calibrating for the nodal point is best done by using a two visually distinct items, one near the camera and the further behind whilst in approximate visual line. My solution is a floor lamp stand nearby, juxtaposed with my front door's window as the background item with which to compare position. Ensure the camera is level, and rotate on tripod head whilst viewing the image. If the position of the target object moves in relation to the foreground the camera isn't in the correct position. By experimenting with the back/forward position of the camera on the pano head you'll locate a place where the two reference items remain consistently aligned. Once you've established a setting combination, ensure you use it ongoing.
It's absolutely vital that your camera is mounted on a base which is level, or your panoramas will appear to wobble when viewed. A panorama head therefore needs to be stably mounted on a tripod. The tripod head must have a spirit guide and easy, accurate adjustment in all directions. I recommend using a leveller between the tripod head and camera – it gives you an additional, precise level of adjustment.
The camera you use makes a difference inevitably. For automated heads you'll need one with a socket for a wired remote trigger, and a trigger cable to connect your camera. For manual heads ideally use a wireless remote to avoid camera movement. I currently use a Canon EOS M6 with its stock lens set on 24mm, equivalent to a ~38mm focal length at 35mm; a relatively narrow field of view. With 30% overlap a complete panorama is made of 6 rows and 8 columns, so altogether 48 images. To give the stitcher some variety of exposures to blend, I set the camera to bracket over and under by three stops for each shot, so in fact each panorama is built from 144 separate image files.
The modern generation of mirrorless cameras with decent sensor sizes are all capable of creating excellent content for panoramas. In an ideal world, a prime lens of 35 to 40mm would be the tool for this job, but the stock zoom suffices easily. The camera mode needs to be set to manual. Enable manual focus and manually focus on your primary subject area. Use smaller aperture for better depth of field. If there's limited light increasing ISO will give you a few stops, although it could be noticeable above 800. Set it to bracket by 3 stops under and over per shot.
Building the panoramic image
Once you have transferred the source set of images which make up the panorama to a computer you can use software to set their relative positions and stitch them together. Stitched images have very large dimensions, typically over 30k pixels wide, which enables optimal post-processing. I find detecting and stitching with very high accuracy levels set is worthwhile, although it's slow: literally 45 mins per image on my reasonably powerful Mac mini, but luckily an easily automated task best done overnight. I use Kolor Autopano for stitching, which it does well. Unfortunately they closed down so this is now unavailable. PTGui is the go-to stitcher now for good results. It's about £250 for the useful version. The purpose of bracketing, and therefore creating 3 exposures per image, is to use the stitching software's ability to pick and merge to a consistent exposure across the image. Ensure you set the output to PSB or PSD (Photoshop format), not jpg as it has lower image quality.
So you have a stitched image which could have imperfections, and will probably need selective attention to exposure variances. It's possible, also, that it's canvas size isn't in a 2 to 1 ratio. These are best addressed in Photoshop. Stitching may fail on skies or other very homogenous areas. Photoshop's tools - particularly content-aware fill - are useful for all this and more.
Photoshop's 360 degree mode is a great feature when working on panoramas, and gives precise editing of the zenith and nadir, allowing patching out of the equipment shadow and support. Once edited, images can be output for display as panoramas.
Presenting and publishing panoramas
For full 360 degree display the dimensions of a panorama must be two to one, and it should cover 360 degrees horizontally and vertically. You'll need software to manage, edit and compile it into web accessible content. Pano2VR is a very capable tool. Using this you can import finished panorama(s), set display parameters and sequences, and create all the files and folders needed for display online.
Publishing your panorama online is achieved by transferring it (by FTP or SFTP) to your web server space. A free application which does this is Filezilla. A panorama set can easily be 100mb, so uploading will take some time.
Setup – how much it costs
Assuming you have a suitable computer, and web hosting space.
- Camera, ideally mirrorless £400
- Sturdy tripod with adaptable head £200
- Secondary leveller £100
- Nodal Ninja manual tripod head £150
- PTGui stitching and Pano2VR presentation software £500
- Adobe Photoshop and Lightroom, per yr £110
- Total £1460
- Add Gigapan automated head +£850
- Total £2310
You can spend more than this, and could get better results or have a more streamlined workflow as a result of doing so.
If you're working to a budget it's well worth looking for used photographic equipment at MPB Photographic and Wex Used.
For the ability to create publication-quality panoramas, software cannot be stinted on. There are no viable low-cost alternatives, either on the image editing or panorama production side.
Processing power counts
The detecting and stitching process is very processor-intensive, and hence how long it take depends on the processor power and RAM of the computer.
My experience of a 6 core i7 3.2ghz 32mb RAM Mac mini, which is a respectable specification, is that in truth it's underpowered and slower than ideal. If you wanted to really crunch through them a powerful Mac Pro would be the (somewhat expensive) solution. It would also run Photoshop's 3D mode in a more fluid way.
Low powered and old computers aren't suitable for processing panorama files of a serious size.
My panorama production workflow
Taking the photos
- Manually controllable camera on automated head programmed for 6 rows of 8 images
- Camera set on manual focus and focused on most relevant distance in scene
- Camera set to expose 3 times on every shot – with -+3 stops range.
- Camera manual exposure with brightest point on edge of 3-stop range
- Camera lens set to about f10 to create depth of field
- Camera ISO between 200 and 800 depending what's required to achieve the above
- Take that shot and stay out of the picture
Processing the photos
- Import each 48 shot, 144 image set into Kolor Autopano Giga, run key point matching
- Output viable scenes at 15,000px width, merging the 3 exposures for optimised levels, in Photoshop format
- Reprocess scenes in Photoshop to optimise exposure and lighting levels
- Use Photoshop 3D mode to fix zenith and nadir issues
- Archive full-resolution Photoshop file in Adobe Lightroom, with geolocation data where possible
Publishing the panoramas
- Using Pano2VR, 360 degree panoramic images can be converted, and edited, into a publishable format and published online both from your own hosting space and via Google Streetview
- In Pano2VR choose 'HTML5' output to create web-accessible content. Once transferred by FTP or SFTP to a server, this set of files will display as your panorama
- Easily add a web-published panorama to a website page with a single line of html
The detecting and stitching process is very processor-intensive, and hence how long it take depends on the processor power and RAM of the computer.
Our panoramas are from £99 →